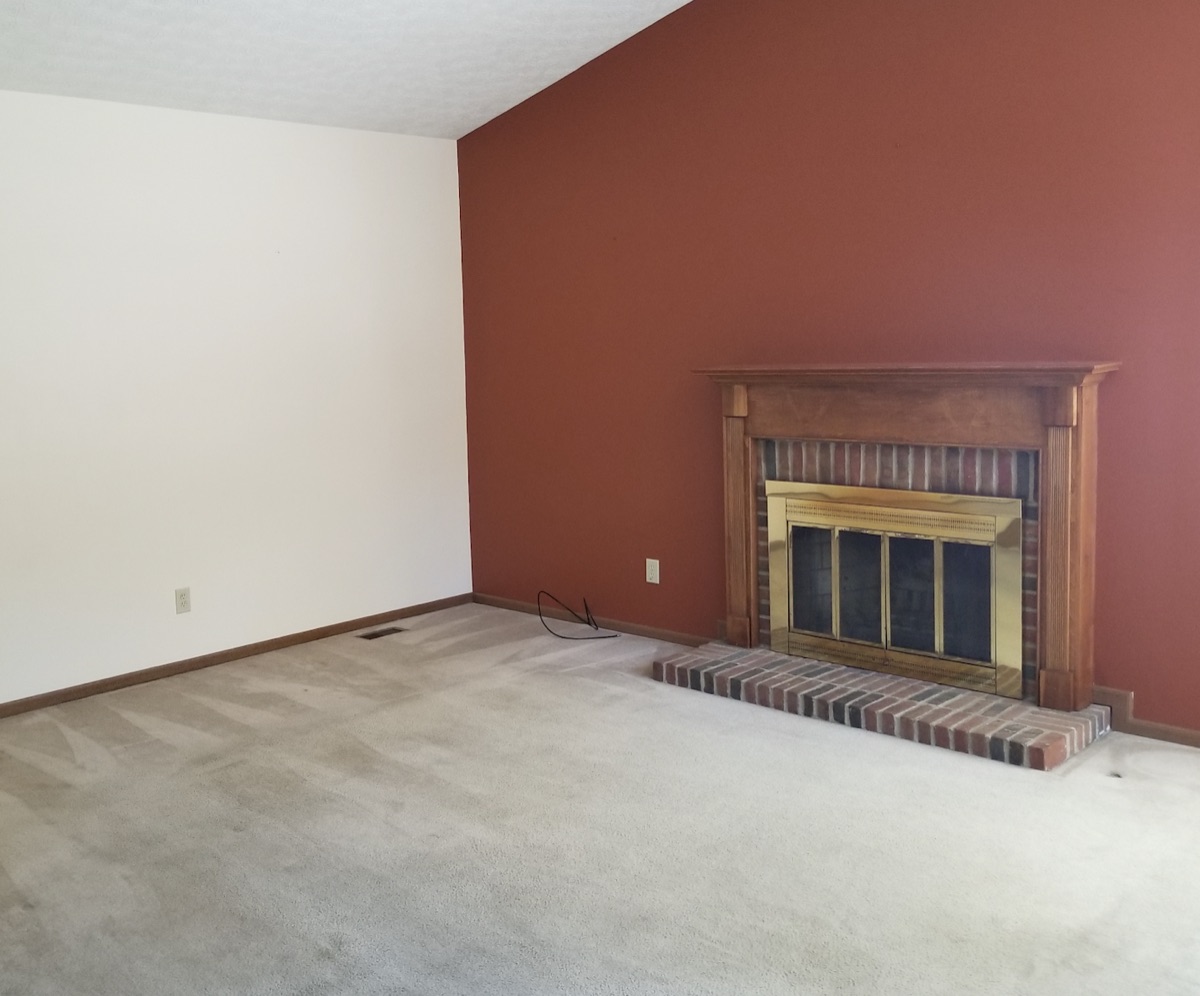
I love a real-wood fire in the winter, but the 90s-era fireplace was dragging down the whole room. Brass doors, a stained oak mantel surround, and brick everywhere — it all screamed outdated. This project replaced the entire look with a rustic faux beam mantel, a granite hearth slab, and an AirStone surround. The result is a fireplace I actually want to sit in front of.
The idea#
The fireplace worked fine — the problem was purely cosmetic. The brass fireplace doors, stained oak mantel surround, and exposed brick hearth were a time capsule from the 90s. Every time I sat in the living room it bugged me. A fresh look was long overdue.
From the start I was drawn to the rustic beam mantel look. The bigger question was what to do with all that brick — remove it, cover it, or paint it? I spent a lot of time searching the internet and YouTube for inspiration and finally found an overhaul video that looked great and felt replicable. That became the blueprint.
I liked the idea of a real barn beam, but after watching a few install videos, the weight and expense added unnecessary complexity. The big box stores had faux beams that would look just as good and came with a major bonus — the hollow center was perfect for hiding a center channel speaker and wiring for a clean TV mount above the mantel.
Constraints#
Removing the brick was off the table immediately. That would mean hiring a crew to jackhammer it out and then doing a complete rebuild — potentially beyond my DIY skill set and definitely beyond my patience. Budget-wise, I wanted to keep the costs reasonable, which meant being smart about materials and doing the labor myself.
Design approach#
After tearing out the old wood mantel surround, I could see exactly what I was working with. The brick facing around the firebox was too narrow — proportionally it wouldn’t look right with the beam I had in mind. I needed to expand outward.
From researching different hearth options, I learned I could get a granite remnant slab and lay it right over the existing brick hearth. Then I’d build a wood frame out from the brick facing to widen the surround and cover it all with AirStone. I’d seen AirStone in another video and liked the look — they’re lighter than regular stone, easy to cut, and come with corner pieces as part of the system, so you get clean edges without custom cuts. I considered running the stone all the way up to the vaulted ceiling, but ruled it out — too much extra complexity, especially with the TV mount going above the mantel.
The plan came together: granite slab over the brick hearth, faux beam mantel mounted into the masonry, a wood-framed substrate around the brick facing, AirStone over everything, and new fireplace doors to finish it off.
Build log#
Demolition#
Demolition was fun, though it may have been the first time I destroyed something in perfectly good shape — just ugly. That felt a little weird. My instincts are normally around preserve, not destroy. But it had to go. Once the old surround was out, I now had an empty canvas.
Mockup and granite#
Using painter’s tape I mocked up the positions of the new mantel and TV placement on the wall. That helped me figure out how long the granite slab needed to be to leave the right size lip over the existing brick hearth. I was still unsure about the framing at that point, but I was ready to execute on the granite, so I picked out a remnant and had it installed over the brick. It looked fabulous and gave a nice hint of what was to come.
TV mount and wiring#
Since I wanted zero visible wires for the TV, this had to come before the stone went up. I had an electrician install a new receptacle for the TV, then I followed his work with HDMI and ethernet cable runs. I also installed a speaker terminal plate so the center channel speaker — hidden inside the faux beam — could plug into the surround sound system cleanly from the mantel.
Mounting the beam#
Behind the wall was mostly the stone firebox, not the framing of the house. So I couldn’t just lag into studs. I opened up the drywall and installed a mounting shelf directly into the masonry blocks. Then I hung the faux beam and secured it down to the mounting rig. That established the top boundary for the framing below.
Framing the surround#
This was the most challenging part of the build — figuring out how to frame a substrate surround that was securely attached to both the brick and the wall framing. A consult with my Uncle Pete helped sort through the options. The path forward was to secure mounting strips on the brick (similar to the mantel mount) and then attach the framing boards to those. Filling in between the mantel and the top of the brick facing involved a long rip cut — steady hands required for that one. Once done, I had a solid substrate ready for stone.
AirStone install#
My Sweetie enjoys a good puzzle, so the night before the install we laid out stones in a pattern on the floor to plan the layout. For the actual install, we started by mounting an alignment shelf at the top of the firebox opening and built up from there. Once the top courses were set, we worked back down below.
My daughter and Sweetie worked as a team inside, handling layout and placement, while I ran the tile saw in the garage feeding them the cut pieces they needed. Over two days we got all the stones installed, from above the hearth up to the mantel and below the hearth down toward the floor. I had cut away the carpet and we left enough gap for the LVP flooring that would come later.
The stones looked great. Finally, I installed the new fireplace doors — a straightforward job that just screws into a mounting bar inside the firebox.
Challenges#
The masonry mounting threw a small curveball. There was a lot of sloppy mortar on the bricks behind the old oak surround. I had to chisel it away to get a smooth surface for the mounting rig. Not super difficult, but it was an unexpected task — you never quite know what’s behind until you open it up.
In hindsight, we should have used cardboard spacers between the stones during the AirStone install. We skipped that step to save time, and while the result isn’t noticeably off, the grout lines would be more even and the last few stones would have been easier to fit with a little more breathing room. Several years in, it’s held up fine — but I’d take the extra time if I did it again.
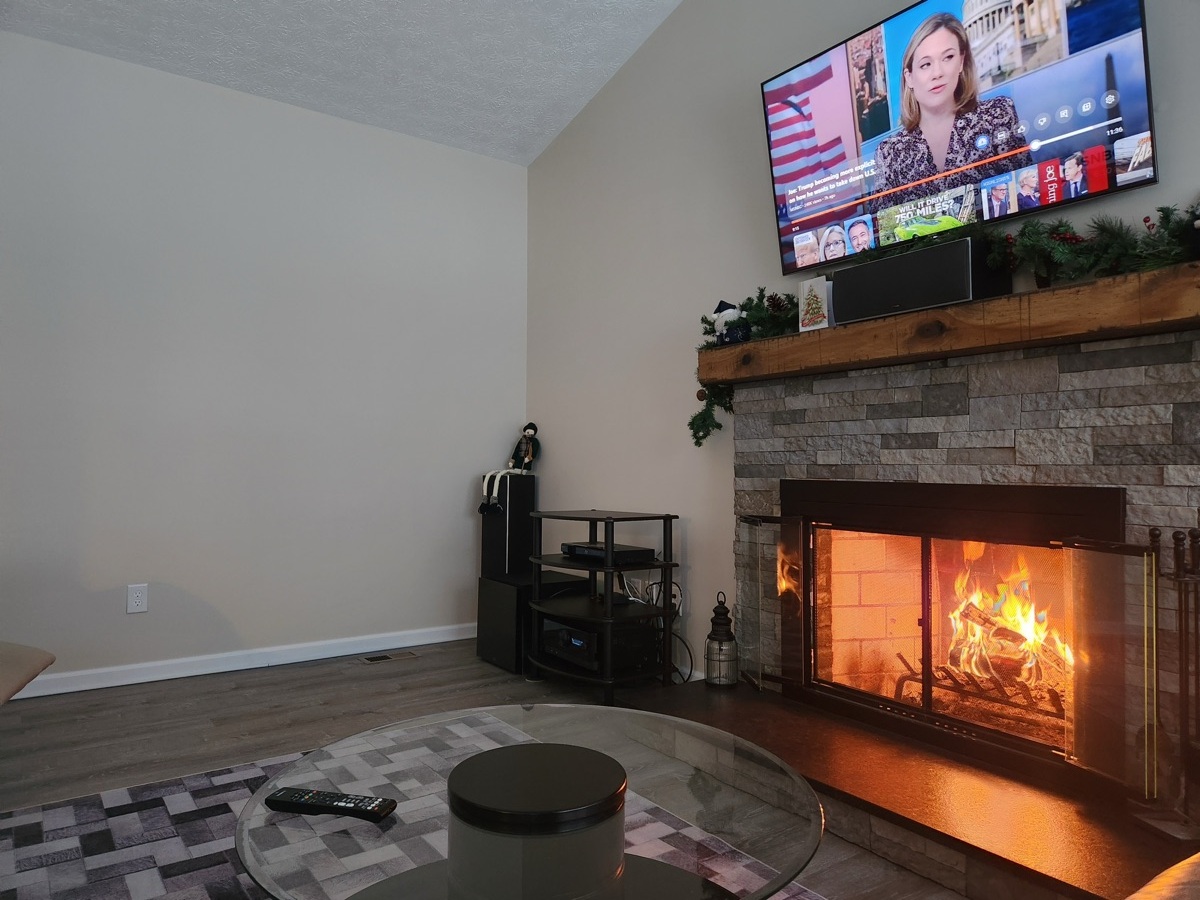
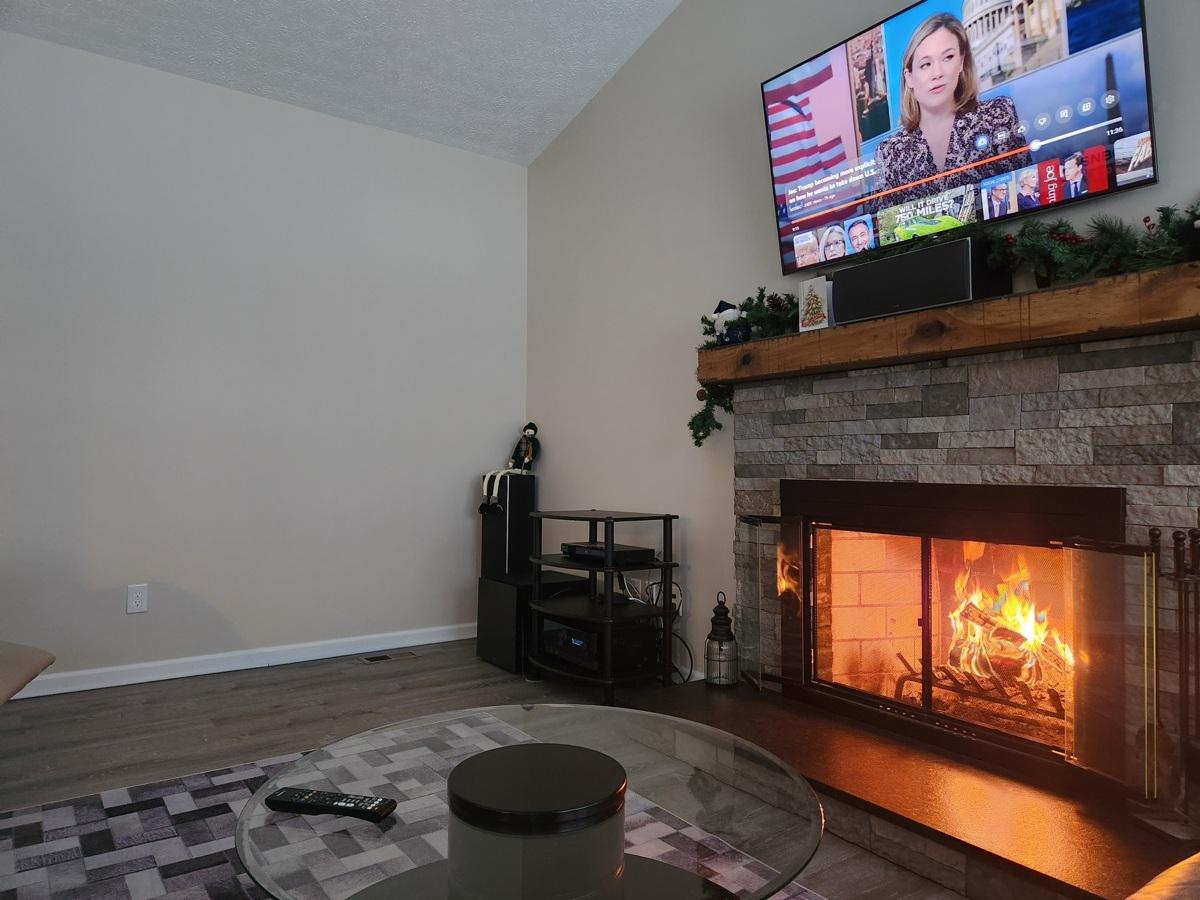
Current state#
The fireplace is fully done and I love it. The LVP flooring eventually went in across the entire first floor (a project for another write-up), which completed the look. I’ve enjoyed many cozy fires since the install, and there’s a particular satisfaction that comes from sitting in front of a fire you built the surround for yourself — mostly DIY, with a critical consult from Uncle Pete and the stone-laying crew.
Lessons learned#
- A faux beam delivers the rustic look at a fraction of the weight and cost of a real barn beam — and the hollow center is a bonus for hiding wiring and speakers.
- Painter’s tape mockups are the cheapest way to get proportions right before committing to cuts and purchases.
- When mounting into masonry, expect to do some mortar cleanup before you can get a flush surface.
- Use spacers on stone installs, even if it seems like overkill. The last few pieces will thank you.
- Consulting someone with more experience (thanks, Uncle Pete) before the hardest phase saved a lot of second-guessing.
- A granite remnant slab is a cost-effective way to get a high-end hearth surface without paying full-slab prices.